ADDTECH | Electric Bike Mechanical Components - Handlebar Grips
By Addmotor | 28 May 2024
The handlebars are one of the few areas where you come into contact with an electric bike while riding. Holding onto the handlebars is how you steer an electric bike, and maintain control and balance. Handlebars are wrapped with special grips or tape to make it easier to hold onto them. These improve the “grip” and ergonomics while minimizing the risk of injuries. Also, they are one of the few things that beginner electric bikers often miss. As experienced electric bikers will tell you: handlebar grips will make or break your riding experience.
So be sure to stick with this article. We’ll talk about handlebar grips for electric bikes and how to replace them.
Handlebar grips are a type of cover material you can wrap or install over the handlebars. These special grips or tape help cover the handlebar frame. It gives you more control and comfort when riding because it’s difficult to hold onto the metal handlebars.
Similarly, if you lose control of the handlebars while it’s going through rocky or sandy terrain, you could fall and injure yourself. Besides, it's difficult to hold onto the handlebars when you’re riding through harsh weather conditions such as rain, snow, or mud. The handlebars could be slippery or too cold.
Handlebar grips make it easier and safer to hold on to your handlebars and control the electric bike without any of the above issues. They provide a solid “foothold” to keep riding in any situation.
The right grips reduce pressure in the sensitive areas of your hands and wrist. They also provide different resting positions for your hand.
So if you're hoping to ride off-road trails in harsh weather conditions, MTB handlebar grips are the better option. Mud, water, sand, and snow don't stick to them as easily and you can have a strong grip even when rolling through heavy bumps and vibrations.
This wing grip increases the surface area on the outer ends of the handlebar. It helps to reduce the pressure on the pinkie finger or the outside of your hands. This helps minimize numbness and Cyclist's Palsy.
Some of the things you need to look out for are:
Meanwhile, a grip with a larger diameter will make it almost impossible to grab onto. It will be like trying to wrap your hands around a large tree trunk.
However, you also need to consider if you’ll be wearing gloves. If you wear gloves, it’s best to go down a few sizes and do some test fitting.
Meanwhile, push-on grips can be tricky. Sometimes they’ll easily slip off the handlebars and other times they’ll be too tight to remove.
Here, the type of material is mostly up to personal preference but there are some notable differences between each. Be sure to consider these when deciding on the best grip material for you.
The type of material can affect your riding. In any case, it’s better to prioritize comfort and shock-absorbing capabilities if you’re riding for longer distances. The best options are silicone, cork, foam, and leather.
Meanwhile, you should focus on weather resistance and gripping power if you’re doing mountain biking or riding offroad. For this, materials such as plastic, textiles, and silicone are safer bets.
However, they will wear out faster and lose their gripping power over time. We recommend softer grips if you ride long distances on smooth roads. The soft material will put less pressure on your hands when you’re riding for hours on end.
If you’re purchasing new grips for an electric bike with a half-twist throttle, you must find compatible twist grips.
These are special grips designed to rotate halfway and help you control the throttle. However, unlike regular gips, they stop where the throttle ends and won’t slip off the handlebars.
So be sure to check if your favorite grips have twist-grip variations. If you can’t find any, try contacting your electric bike’s brand.
So be sure to stick with this article. We’ll talk about handlebar grips for electric bikes and how to replace them.
Handlebars VS Handlebar Grips
The handlebar holds the gear shifters, brake levers, display, and other components. It’s usually a narrow carbon, steel, or alloy bar.Handlebar grips are a type of cover material you can wrap or install over the handlebars. These special grips or tape help cover the handlebar frame. It gives you more control and comfort when riding because it’s difficult to hold onto the metal handlebars.
Handlebar Grips VS Tape
Handlebar grips or handlebar tape are two ways to improve the grip of your electric bike’s handlebars. Handlebar grips are the most common option for electric bikes with flat or riser handlebars. Meanwhile, tape is preferred for handlebars with curves. So types like drop handlebars and butterfly handlebars do better with tape. If you’re a beginner to eBiking and use your bike for leisure or casual riding, we recommend starting with handlebar grips.Why Handlebar Grips Are Important for eBiking?
With proper handlebar grips, your hands or gloves won’t slip off the handlebars and you can maintain control while riding.Maintaining Control On the Electric Bike
Handlebar grips are important when riding at high speeds or trudging through off-road terrain. Even a slight turn of the handlebars at high speeds could veer the electric bike and cause a crash.Similarly, if you lose control of the handlebars while it’s going through rocky or sandy terrain, you could fall and injure yourself. Besides, it's difficult to hold onto the handlebars when you’re riding through harsh weather conditions such as rain, snow, or mud. The handlebars could be slippery or too cold.
Handlebar grips make it easier and safer to hold on to your handlebars and control the electric bike without any of the above issues. They provide a solid “foothold” to keep riding in any situation.
Improving Ergonomics and Minimizing Injuries
Handlebar grips are paramount in preventing hand-related injuries and keeping your experience stress-free. Wrong or improper grips can cause numbness in your hands. They can also lead to injuries such as Carpal Tunnel Syndrome and Cyclist’s Palsy.The right grips reduce pressure in the sensitive areas of your hands and wrist. They also provide different resting positions for your hand.
Different Types of Grips for Straight Handlebars
Handlebar grips come in various diameters, materials, designs, and use cases. But, when it comes to most electric bikes, there are three main types:- BMX grips
- Comfort grips
- MTB (Mountain Bike) grips
BMX Grips
BMX grips are the most common type of handlebar grip. They are inexpensive, easy to install, and good for casual riding. You can get BMX grips of different diameters, compounds, and lengths. They are mostly push-on grips so you can install them without an Allen wrench or special tools.MTB Grips
MTB grips are mostly designed for mountain biking. They are water and dust-resistant while supporting riders who wear gloves.So if you're hoping to ride off-road trails in harsh weather conditions, MTB handlebar grips are the better option. Mud, water, sand, and snow don't stick to them as easily and you can have a strong grip even when rolling through heavy bumps and vibrations.
Comfort/Ergonomic Grips
Comfort grips usually feature soft, comfortable materials with a “wing grip” on the outer ends.This wing grip increases the surface area on the outer ends of the handlebar. It helps to reduce the pressure on the pinkie finger or the outside of your hands. This helps minimize numbness and Cyclist's Palsy.
How to Pick the Right Grips For Your Electric Bike?
Ideally, comfort grips are your best bet. However, you need to find one that fits your hands and riding style.Some of the things you need to look out for are:
- Diameter/Grip Size
- Installation/Removal Method
- Type of Material
- Stiffness of the material
- Throttle Mechanism (Important for electric bikes with twist-grips)
Diameter/Grip Size
This determines the “thickness” of the handlebar grip and how much your hands can wrap around them. You don’t want grips with a lower diameter. It will be too narrow, like trying to hold a pencil.Meanwhile, a grip with a larger diameter will make it almost impossible to grab onto. It will be like trying to wrap your hands around a large tree trunk.
How to Find the Ideal Grip Size
You want to find the grip size that perfectly fits your hands. You can do this by trying out several sizes or measuring your hands’ grip width. The grip width is the length from the top of the middle finger to where your thumb starts to branch off from the palm (usually that’s half the length of the palm).However, you also need to consider if you’ll be wearing gloves. If you wear gloves, it’s best to go down a few sizes and do some test fitting.
Installation/Removal Method
Handlebar grips come in two ways to install: push on and lock on. With push-on types, you can simply slide the grip into the handlebar and it will stay in place. With lock-on types, you need to slide the grip into the handlebars and then tighten several screws so it locks in. Nowadays, most cyclists recommend lock-on grips. They are easy to replace and you have more freedom in adjusting the tightness.Meanwhile, push-on grips can be tricky. Sometimes they’ll easily slip off the handlebars and other times they’ll be too tight to remove.
Type of Material
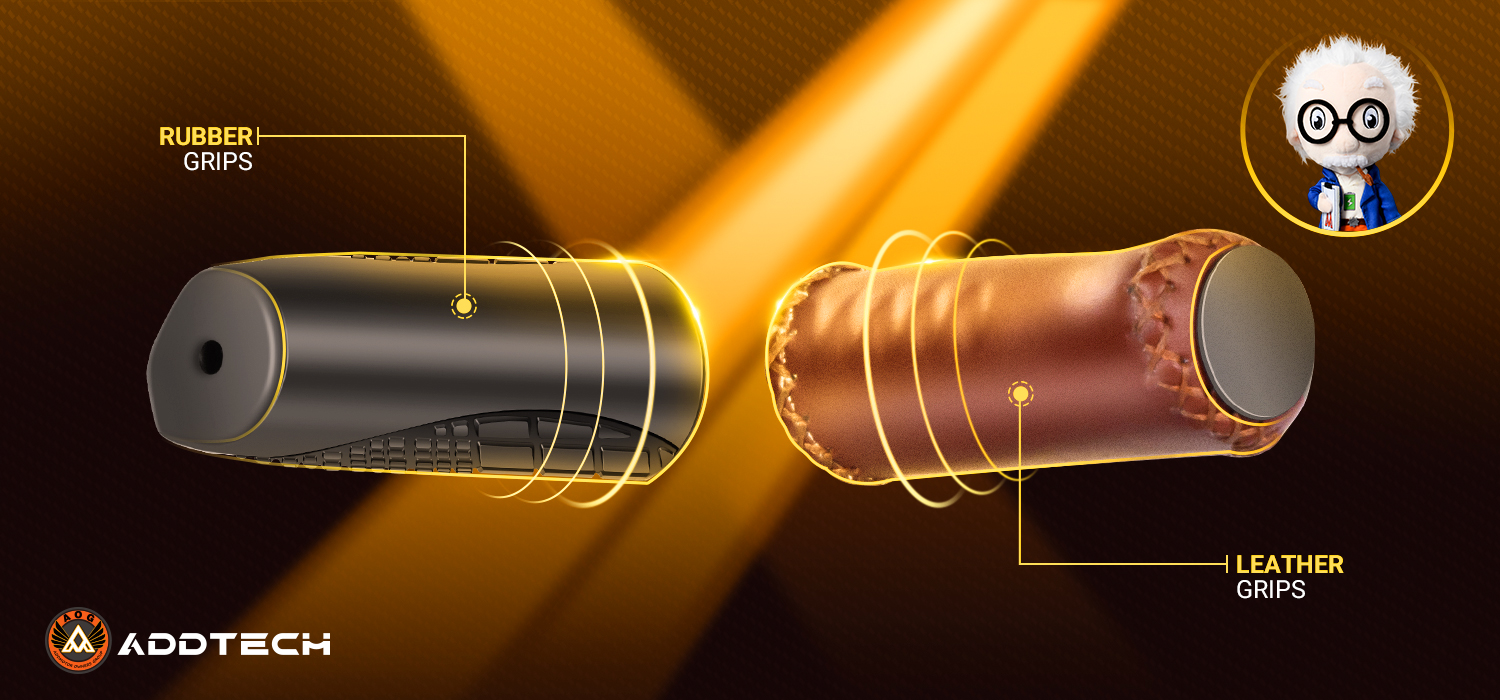
Brands and manufacturers use various materials and compounds when manufacturing handlebar grips.Here, the type of material is mostly up to personal preference but there are some notable differences between each. Be sure to consider these when deciding on the best grip material for you.
- Rubber: Commonly used and inexpensive. Rubber grips have a decent grip and weather resistance. It’s stiffer than other compounds, so it’s less comfortable during long rides.
- Silicone: Offers good grip, weather resistance, and comfort. The only downside is that it can be more expensive than other materials.
- Foam: Best for maximizing comfort and reducing impacts. However, it can lose its grip during rainy weather and tends to wear down faster.
- Plastic: Extremely durable and can last a long time. But, it doesn't have good shock-absorbing features so it’s less comfortable for long-distance riders.
- Leather: Comfortable and breathable material that adjusts to the shape of your hands over time. However, it’s more expensive and loses its grip when wet. The Addmotor GRANDTAN X E-Trike has leather handlebars, and with its exclusive dual shock and step-through frame, it's the most comfortable electric trike around.
- Cork: One of the best natural materials that are comfortable, feels good to the touch, and minimizes vibrations. Unfortunately, it’s less durable and more expensive.
- Gel: Offers the best shock-absorbing properties while compromising on weight and durability.
- Textile/Woven Materials: Offers solid gripping power and shock-absorbing capabilities. However, it’s one of the least durable materials for handlebar grips.
The type of material can affect your riding. In any case, it’s better to prioritize comfort and shock-absorbing capabilities if you’re riding for longer distances. The best options are silicone, cork, foam, and leather.
Meanwhile, you should focus on weather resistance and gripping power if you’re doing mountain biking or riding offroad. For this, materials such as plastic, textiles, and silicone are safer bets.
Stiffness of the Material
Handlebar grips come in dozens of materials. Picking the “best” material is simply up to personal preference. That said, you want to look out for the stiffness of the material. Softer materials will feel comfortable and easier to hold onto. They’ll also cushion impacts and minimize injuries.However, they will wear out faster and lose their gripping power over time. We recommend softer grips if you ride long distances on smooth roads. The soft material will put less pressure on your hands when you’re riding for hours on end.
Throttle Mechanism (for Twist Grips)
Most electric bikes come with throttle controls for adjusting the electrical assist. These are mostly half-twist throttles that fit into the handlebar itself.If you’re purchasing new grips for an electric bike with a half-twist throttle, you must find compatible twist grips.
These are special grips designed to rotate halfway and help you control the throttle. However, unlike regular gips, they stop where the throttle ends and won’t slip off the handlebars.
So be sure to check if your favorite grips have twist-grip variations. If you can’t find any, try contacting your electric bike’s brand.
How to Replace the Grips on Your Electric Bike?
If you’re looking to install a new pair of handlebar grips on your electric bike, here’s what you need to look for:Removing Lock-On Handlebar
- First, note down the old handlebar grips. Are they push-on or lock-on types?
- If you’re not sure, try looking for any bolts, fasteners, or clamps around the grip or on the outside of the handlebars
- If the grips have an end-cap try removing it and see if there are any fasteners. You can use a flat-head screwdriver to take out the end cap
- If you find any fasteners, use an Allen wrench or appropriate tool to loosen these bolts
- Then, you can easily slide out the lock-on grip from the handlebars
- Make sure to use a piece of cloth or some soapy water to clean the handlebars from any glue or residue
Removing Push-On Handlebars
If you’re sure the old grips are push-on, try the following steps:- First, gather the tools. You’ll need:
- Flat-head screwdriver, razor blade, or similar prying tool
- A can of compressed air or a spray bottle/dropper of rubbing alcohol
- A few clean pieces of cloth
- Allen wrench
- Then, loosen the clamps on the brake levers and shifters. Then, push them to the middle of the handlebars so they’re safely out of the way.
- If you have any other accessories mounted on the handlebar, it’s best to remove them.
- After that, slide the flat-head screwdriver or prying tool between the push-on grip and the handlebar. Be careful not to damage or cut into the handlebar or grip.
- Use the prying tool to create a small gap between the handlebar and grip.
- Then, apply compressed air or rubbing alcohol into this gap. It will help loosen the grip from the handlebars.
- Make sure to apply air or alcohol from both sides of the handlebar.
- After that, twist or pull the grip so it comes out.
- Finally, use a few pieces of clean cloth to wipe the handlebars and remove any lubricant or residue.
Installing Push-On Handlebars
- Make sure the handlebars are clean.
- Then, spray or apply some rubbing alcohol onto the handlebars. This will lubricate the area where the grip will slide into.
- If you have grip glue or grip cement, you can apply these to the handlebars.
- After that, slide the push-on grips into the handlebars.
- Rotate the handlebars to fit your riding style.
- Let it sit for several hours or overnight. This will ensure the alcohol or glue evaporates and creates a tight fit.
Installing Lock-On Handlebars
- After making sure the handlebars are clean, slide the lock-on grips over the handlebars.
- Then, rotate them to find your perfect fit.
- After that, tighten the bolts in the lock-on grip. Check the user manual (if any) for exact instructions or torque values.
- Then, test the grip and make sure it doesn’t slide or rotate. If it’s loose, you might want to start over.
- Finally, install the end caps, and you’re done.
Conclusion
Handlebar grips are important to minimize wrist or palm-related injuries and give you more control while riding. There are various types of grips but if you’re just starting out, comfort/ergonomic grips are the best option. Also, it’s important to consider factors such as the grip size/diameter, installation method, and stiffness. You need grips that are easy to replace, fit comfortably, and don’t hurt while riding long distances.Leave a Reply
Your email address will not be published.Required fields are marked. *
Latest Stories
_1775893365.jpg)